Instructions
Place Scor-Pal® on a flat surface with ruler at the top.
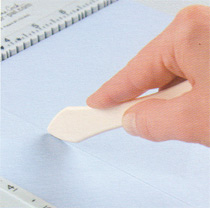
Place cardstock on the scoring surface. The sides and the top act as fences to properly align your paper for accurate scoring. Align with the top and either side fence depending on the size of your cardstock.
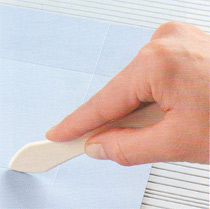
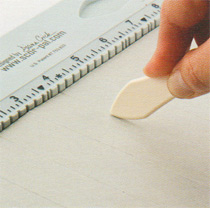
There are notches at the beginning of each score line to show you where the groove begins. With one hand holding the cardstock, hold the scoring tool as you would a pen or pencil (45 degree angle). When working with double sided Designer paper that has a white core, lower the angle of the tool ( 30 degrees). Carefully draw the scoring tool down the paper, using an even pressure.
The first time you use Scor-Pal practice on a piece of scrap cardstock to determine the amount of pressure needed for your “hand”.
To clean your Scor-Pal, wipe with a damp cloth. Dry thoroughly before using.
Card Making Tips and Paper Information
One of the key benefits of Scor-Pal is the ability to score multiple score lines at the same time, without moving the paper. This is invaluable when making grid, reverse grid cards, gate fold, accordion folds, brochure/flyer scoring, box making, origami, iris folding and boxes galore!
When possible, always score with the grain of the paper. Cup the paper in your hands bringing the sides together. If it bends easily this is the grain of the paper. Turn the paper in the other direction.
Repeat same action. The paper will not bend as easily. You will feel a slight resistance as it is bending “against the grain”. On a piece of cardstock 8 ½" x 11” the grain of the paper is usually down the 11” length. In most cases the grain of the paper is with the longest side, “grain long”. The paper fibers run in this direction. For a 12” x 12” paper do the “grain of paper” test explained previously.
Another easy way to test for the grain is by tearing the paper. With the grain will give you a straighter tear.
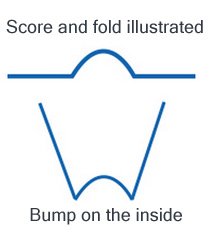
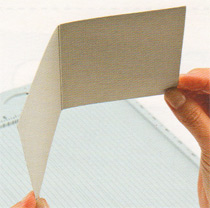
The bump goes to the inside. This gives a neater appearance to the inside of the fold.
When you make the score line you are spreading the paper fibres ready for the fold. If you fold so the score line is to the inside you are squashing the fibres you just spread apart. If you check a package of 3" x 3" folded cards from Stampin Up you will see that the indentation is on the textured side of the cardstock. This reinforces,you fold so the score line is to the outside of the fold with textured side out.
When making accordion folds score at intervals, then turn the paper over and score in between the previous scores i.e. a one inch accordion along an 11” length, score at 1”, 3”, 5”, 7” and 9”. Turn the paper over, score at 2”, 4”, 6”, 8” and 10”. The indentation is the mountain fold. If you are making the standard A2 card, 4 1/4” x 5 1/2”, score the full eleven inch length at 4 1/4” then cut the cardstock at 5 1/2”. This way you are saving time by only scoring once to make two cards.
Gate Fold Cards
● Use the grooves marked with a small dot. They are at 2 1/8” and 6 3/8” from the left fence.
Diagonal Scoring
For diagonal scoring ensure that both corners are aligned to the same groove. The ruler markings along each side fence will help with scoring a 12” piece of paper on the diagonal. Align the page with the 6” groove using the side measurements as a reference for centering.
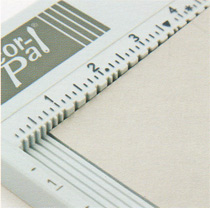
Ruler Markings along side fences
● Use the markings to quickly ensure your paper has been cut straight.
● Use the Scor-Pal as a ruler. Lay down a scrap piece of cardstock and you can quickly tell its width and height.
Scoring at 1/8-Inch Intervals with previous models of the Scor-Pal
NOTE: These instructions are only for older Scor-Pal scoring boards to help you make 1/8" precision scores. Our new Scor-Pal Eighths product has 1/8" groove markings.
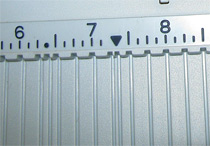
When making 1/8" scores such as at 3 5/8", you will move the left side of the paper away from the left fence.
For a 5/8" score, count back five grooves and position the left edge of the paper at the middle of that groove.
Always go up one full number - so score at 4 inches (see image to the right).
It is always two steps: Step one, count backward for eighths; and Step 2, go up one full number for your scoring line. You go up one number because you are losing the first inch by using it for the eighth measurement. For example, for 7 3/8", count back 3 and score at the 8" mark, for 5 7/8", count back 7 and score at the 6" mark.
Scor-Pal produces a score line similar to a letterpress score.
Letterpress scoring
A letterpress is basically the same type of machine used to foil-stamp and emboss. It is a press that uses pressure to create a pattern. A letterpress operates with a "male" scoring rule, in our case the Scor-Tool, a "female" channel, the groove and the paper in between. When the rule is pressed into the channel, it raises a ridge on the inside of the fold. The ridge acts as a hinge, making the paper easier to fold and ensuring a clean, straight, and durable result.
A letterpress score affords the cleanest and most accurate fold possible. Although you can score in any direction, it's harder and riskier to go against the grain or across areas with heavy ink coverage. The need for scoring depends on the particular grade, finish and basis weight of your paper.
|